Extracting Data from FOS Pervasive Tables
Installing Pervasive & Initial Information
*If Pervasive is already installed on the machine, please skip to the next section (Extracting Data from the Pervasive Database)*
Before beginning the extraction, you will need to download and install Pervasive on the same machine that you have downloaded the FOS BTR files. The Pervasive Workgroup version can be downloaded directly from Actian. Please note: The Pervasive Workgroup version comes with a 30- day trial license. Once the trial expires, a permanent key will be needed. This key can be purchased through Actian.
After downloading Pervasive, launch the program and navigate to the "Database" section. If you need to create a Database to see the FOS BTR files, please follow the steps below.
How to create a database:
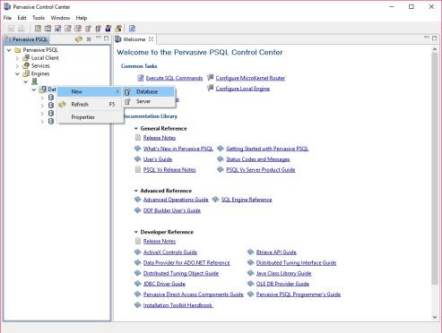
1. On the left-hand menu of the Pervasive program, under Engines-->Server-->Databases, right click on "Databases" and select "New"-->"Database".
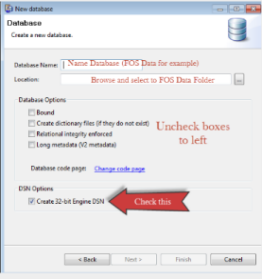
2. For the New Database menu:
- The Database name can be of your choosing, however, we recommend "FOSData". - For Location, point to the location of the FOS BTR files.
- Ensure the selections under "Database Options" are unchecked. Ensure "Create 32-bit Engine DSN" is selected.
- Select "Finish" upon completion.
Extracting Data from the Pervasive Database:
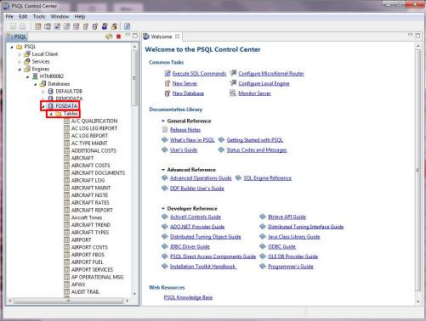
1. Open the PSQL Control & Documentation Program from the Start Menu.
2. Within Pervasive, select the FOS database.
3. Then, expand the "Tables" option.
- The list of FOS Tables will display on the left hand side.
- Unfortunately, there is no way to export all tables into the CSV or Excel in one swoop. It must be done on a per-table basis.
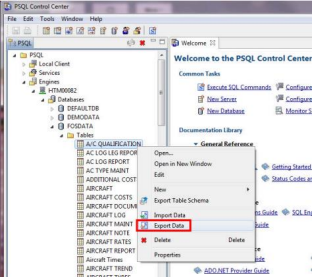
4. Right-click on a table. In the screenshot below, the A/C Qualification table has been selected. Then, select the "Export Data" option.
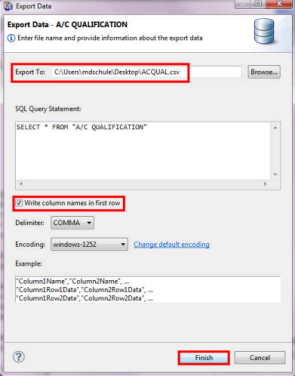
5. In the next window, enter a file location in which you want the exported data to be sent. Enter a file name at the end. An easy suggestion would be to give it the same name as the table and then .csv or .xlsx.
6. In this screen, also be sure to select the "Write column names in first row" checkbox. After doing both items, select "Finish".
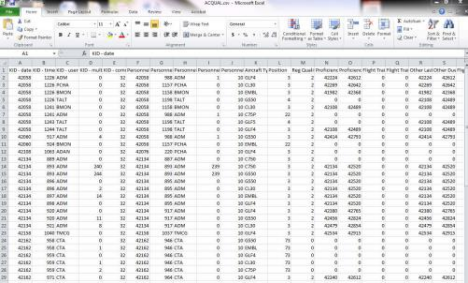
7. After the export is complete, open the CSV file with the table data. Below is an example of how the information can look after exporting to the csv or xlsx format.
-Please Note: The above steps will need to be performed for each FOS Table.
Related Articles
Updating Pervasive
All users will need to be logged out of FOS for Pervasive to be updated. Also, if users are accessing FOS using a shortcut on their computer once the version of Pervasive has been updated on the server the local machines will also need to update to ...Error: Pervasive Database is already in use
Error: Pervasive Database is already in use. Solution: If the FOS Database is not listed in the Pervasive Control Center, however the user receives an error that the database already exists when trying to create the database open the registry editor. ...Error: set ok action: new data already enabled
Error: FOS System Error - Report to CTA set ok action new data already enabled Solution: Have all users log out of FOS and restart the pervasive services on the FOS Server.Updating FOS
Updating Flight Operations System (FOS) (Only for FOS systems that are under a current support contract) Before running the FOS Installer, you will need to uninstall the FOS Vendor Alliance Program on the server. If your company has FOS Mobile, the ...SIFL Tables
SIFL Table The SIFL table contains the monetary values required to calculate the imputed income. You may need to create the first table or you can just copy an existing table and thereby alleviate the need for entering some of the information as a ...